
Sundance opened to rave reviews in June 2005. Nestled on glacier-carved bluffs between Torch Lake and Grand Traverse Bay, Sundance exemplifies the extraordinary natural beauty of northwest Michigan with views of both Torch Lake to the east and Lake Michigan to the west. With wide, playable fairways, superbly sculpted greens, vast windswept bunkers, heather-clad mounding and spectacular vistas, Sundance will delight the scratch golfer or a newly fledged beginner. Sundance has quickly become one of the premier golf courses in northern Michigan.
*Note: Yardage on video is inaccurate. Please refer to the score card for accurate yardages.*
-
Hole #1

Set forth before you are the glistening, emerald green fairways, sprawling white sand bunkers and the wispy amber heather that seamlessly bind the holes to one another. This first hole is designed to gently guide you into your golf experience at Sundance. From the elevated tee this dogleg left presents a spacious landing zone protected by a large fairway bunker through the landing area and a large grass bunker on the left. Beyond the safety of the playable rough, deep wavy heather awaits the errant shot straying too far right. Guarded by three sand bunkers in front, a birdie putt beckons from the expansive, undulating green which is best approached from the air but can also accept a run-up through a narrow approach.
Black 392 Blue 368 White 349 Gold 329 Handicap 16 Par 4 Red 309 -
Hole #2
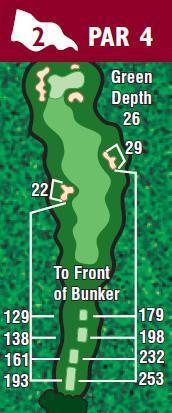
Another very playable hole designed to help you get your game on. From the tee, a well struck shot follows a sight line to the target bunker located behind the green. A deceptively large landing area lies beyond the fairway bunker that runs halfway through the fairway at 180 yards. A generous rolling green awaits a short iron shot that flies the sand bunker protecting the right half of the putting surface. Avoid going too far left where a sprawling sand bunker curls around the green.
Black 337 Blue 316 White 305 Gold 282 Handicap 14 Par 4 Red 263 -
Hole #3
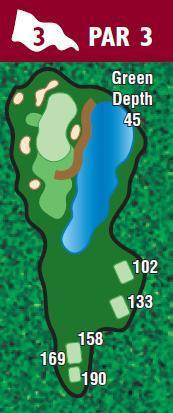
This picturesque setting could be the signature hole on any other course. Nestled between a beautifully sculpted amphitheater and a crystal clear pond, lies one of the largest greens on the course. Fronted by a masterfully crafted native stone wall and sandwiched between greenside bunkers is a stepped putting area comprised of three distinct pin zones. On any given day club selection is paramount and may vary by up to three clubs depending on wind conditions.
Black 190 Blue 169 White 158 Gold 133 Handicap 10 Par 3 Red 102 -
Hole #4
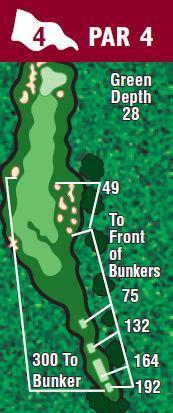
Swing away from an elevated tee on this split fairway dogleg right. The optimum tee shot favors a slight draw over the center of the upper fairway which will yield extra yardage from a concealed down slope. Avoid the six sand bunkers and expansive heathered mounding on the right side or take the safe and longer route on the lower left fairway. Consider the prevailing southwest wind on your second shot or you'll find one of the three sand bunkers guarding the left side of this two tiered green. Pin placements on the left side will accept a run-up shot but in order to have a chance at birdie on the right, you'll have to fly a foreboding pot bunker that's ready to swallow anything short.
Black 390 Blue 373 White 351 Gold 330 Handicap 12 Par 4 Red 273 -
Hole #5
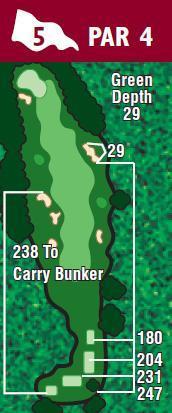
This mild dogleg left spells trouble on the left from start to finish. On a miss-hit to that side consider yourself lucky if you wind up in one of the three sand bunkers short of the landing area or numerous grass depressions benched into the side slope of this hole. Trouble is abundant on the right if you stray too far in the form of a large sand bunker at the landing zone with heather and OB beyond that. While you're over there take solace in the gorgeous view of Old Mission Peninsula and Grand Traverse Bay to the west. Your second shot is to a diminutive redan style green complex sporting a hogback ridge that bisects the putting surface from front to back. A steep faced sand bunker protects the front left and anything long requires a precise flop shot back.
Black 368 Blue 352 White 348 Gold 322 Handicap 6 Par 4 Red 301 -
Hole #6
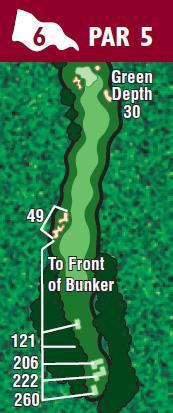
Take a moment to carefully consider your strategy from this tee situated dramatically above the first landing zone and decide if you want to flirt with the hardwood corridor to the right or the two large sand bunkers on the left. This double dogleg hole favors ball placement to the center/right in order to remove the row of majestic 100-year-old sugar maples that grace the left rough from play. If you tempt fate and avoid the two bunkers in front of the green you will be received by one of the more challenging putting surfaces on the course. You can easily add a stroke or two if you're above the hole on this one.
Black 527 Blue 493 White 485 Gold 473 Handicap 8 Par 5 Red 388 -
Hole #7
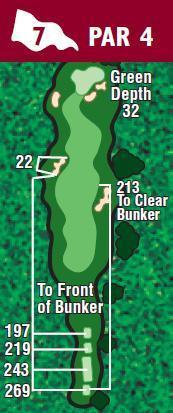
Aim slightly right of center and if you avoid the bunker situated short right of the landing area you will be rewarded with additional yardage from the down slope. Don't allow the beautiful backdrop created by the mixed forest of hardwoods and conifers on the horizon to distract you too much. Grass bunkers on the left and three sand pot bunkers on the right frame this unique green. The real trouble exists behind and right of the green where long may result in pitching back up from a thirty foot deep chasm and right could result in an unplayable lie if you land in the rocky arroyo. The most distinguishing characteristic of this green however is in its large reverse tier that cascades away from the incoming shot. Going long on a front pin placement will result in a most challenging putt.
Black 387 Blue 367 White 356 Gold 337 Handicap 18 Par 4 Red 315 -
Hole #8
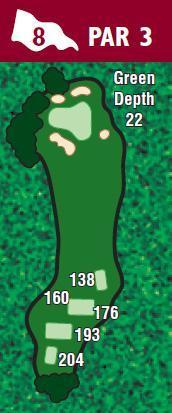
No breather here. At 204 yards this is the toughest par 3 on the course and with its shallow, undulating, plateau green surface and protective bunkering is unyielding to anything less than a perfectly executed or extremely lucky tee shot. For the more timid or less fortunate tee shots that carry the heather, a thick bluegrass rough awaits.
Black 204 Blue 193 White 176 Gold 160 Handicap 4 Par 3 Red 138 -
Hole #9

Now's the time to let the big dog bark. This hole can take everything you have on the first two shots and then some. From the tips you have a forced carry of two hundred yards in order to clear the lowland sanctuary area. If you succeed in threading your tee shot through an unforgiving swath wrested from the surrounding cedars, avoided the bunker and deep swamp on the right, and have managed to advance it far enough to cut the dogleg, your next shot begins an uphill march to the green; providing you have avoided the three large fairway bunkers left of the landing zone. Now, all that remains is a short iron to an elevated unforgiving, three tiered green ensconced among seven sand bunkers. Hope for birdie but be satisfied with par.
Black 608 Blue 562 White 540 Gold 475 Handicap 2 Par 5 Red 405 -
Hole #10
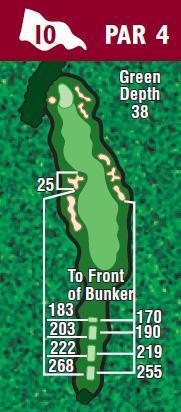
Time for a breather. Once again you'll be treated to the same spectacular panorama that you enjoyed on the first hole from a slightly different perspective. This hole offers another generous landing area but also features an abundance of sand. If you're a gambler with some game, take it over the left fairway sand bunker otherwise aim straight down the center. A good drive will leave a short iron home to one of the deeper greens on the course. Anyone attempting to run a shot onto the green should beware of the grass depression and false front on the left side of the approach.
Black 412 Blue 384 White 369 Gold 347 Handicap 15 Par 4 Red 327 -
Hole #11
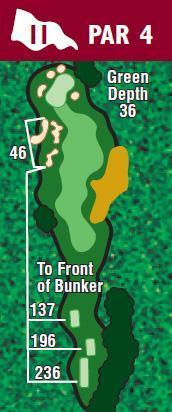
This dogleg left is easily reachable in two for the player that threads his tee shot between three fairway bunkers on the left and the waste bunker on the right. Control rather than length should be your strategy on this hole. A short iron shot to an elevated green rewards the player that favors accuracy over length from the tee.
Black 325 Blue 311 White 292 Gold 278 Handicap 11 Par 4 Red 226 -
Hole #12
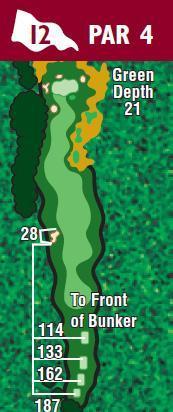
Long, tough and testy. There's plenty of room at the landing zone so use it wisely to set up your second shot. This green complex is tight, shallow and well defended, requiring an exacting second shot. Ample trouble waits in the form of a dense hardwood forest on the left; sand bunkers, grassy depressions and a treacherous, sprawling sandy waste bunker on the right that will haunt you through the next two holes. The putting surface on this hole is another one that pays tribute to the designs of days gone by in the form of the classic "valley of sin" putting surface.
Black 446 Blue 421 White 411 Gold 392 Handicap 5 Par 4 Red 373 -
Hole #13
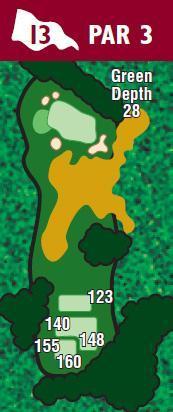
When standing on the elevated tee don't let the natural beauty of this green site entice you into letting your guard down. Anything less than a well placed tee shot will find hardwoods, heather, grass depressions, sand and waste bunkers. The putting surface is fraught with subtle deception and must be carefully read to score well.
Black 160 Blue 155 White 148 Gold 140 Handicap 17 Par 3 Red 123 -
Hole #14
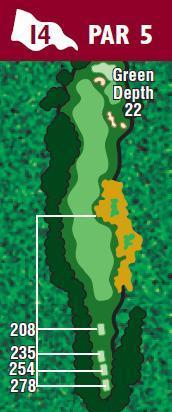
Once again the massive waste bunker comes into play and taunts you from the tee until well past the first landing zone. An expansive landing zone stretches nearly to the tree line that borders the entire left side of the hole. If you want any chance of reaching the green in two however, you must skirt the right side of the fairway and risk disaster in the waste bunker. A long well placed drive provides a rare eagle opportunity if your second shot manages to fly the deep sand bunker that stands sentinel at the front of the green. A more conservative and safer strategy would be to lay-up short of the bunker in one of two distinct landing zones giving you a solid chance at birdie or par.
Black 512 Blue 492 White 483 Gold 469 Handicap 7 Par 5 Red 442 -
Hole #15
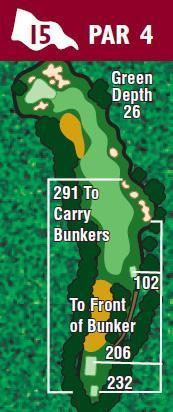
A true risk and reward hole. This is the number one handicap hole for good reason. If you hope to have any chance of reaching the green in two then be prepared to unleash a heroic tee shot followed by a well struck midiron. Off the tee you must negotiate a flight line over the wetland that stretches nearly the full length of a fairway quartering away from you. This is when you really have to prove how much you can bite off and chew. Your second shot on this hole presents more challenge than the first owing in large part to the forced carry over the natural wetland and substantial bunkering to the right, rear and front of the two tiered green.
Black 435 Blue 425 White 409 Gold 398 Handicap 1 Par 4 Red 305 -
Hole #16
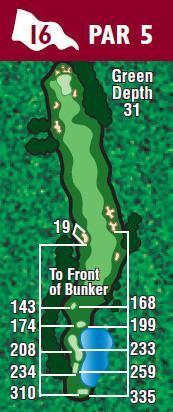
As you tee up on this hole you are teased with a view of the scenic peninsula that is the eighteenth green across the lake from you. In front of you is an uphill hole framed by woods on the left and meandering heather covered mounding on the right. Your main goal is reach the upper tier of the stepped fairway without ending up in one of the massive sand bunkers guarding the right side or the deep and steep pot bunker benched into the left side of the lower tier. It is possible to reach the small two level green on your second shot but only if you fly the grass bunker that defends the center of the approach plateau. Though not large in size and well bunkered, the green site does offer a manicured collection area on the left to gather errant shots. No tricks or surprises on the putting surface; what you see is what you get.
Black 581 Blue 505 White 479 Gold 445 Handicap 13 Par 5 Red 414 -
Hole #17
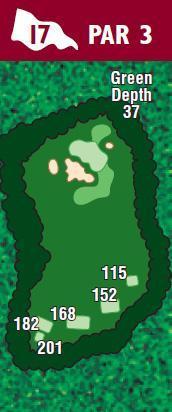
Camera? Club? Or both. A magnificent setting with an eighty-foot drop to the green. A breathtaking view is yours from a tee complex that overlooks the shimmering Caribbean blue waters of Torch Lake and the pristine beauty of the forested horizon surrounding it. Below you, surrounded by deep bunkers and aggressive heather, the green awaits as a rose among thorns. Once on the putting surface pay close attention to the read of your putt. The natural grade of the surrounding terrain may affect your perception of slope and can easily confuse the best of putters.
Black 201 Blue 182 White 166 Gold 152 Handicap 9 Par 3 Red 115 -
Hole #18
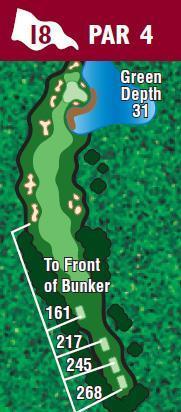
If you have any hope of reaching the green in two it is entirely dependent on quality of your drive. A well struck shot centered between the fairway bunkers on the left and the lone maple on the right will put you in position to either lay-up, attempt to run it on or go for all the marbles by flying the water that protects nearly all of the this dramatic, rock encrusted, semi- peninsula green. As you ponder your shot from the elevated landing zone, your eyes will once more be tempted to drink in the outstanding vistas that surround you. Should the next shot not have your full attention however, the lake and sand bunkers are ready to claim any poorly stuck ball. Once on the green the battle continues. This is a large green with three distinct pin zones separated by ridges and steps that must be negotiated should you be in an adjoining pin zone.
Black 460 Blue 437 White 427 Gold 409 Handicap 3 Par 4 Red 353